桥接模式(结构型)
前言
在绘图时候,会用到各种各样的画笔,画笔按照型号大小,可以分为大中小三种型号,而对于三种不同的型号的画笔又包含多种颜色,对于M种型号的N种颜色的画笔,需要涉及到M*N种画笔对象;但如果把画笔的型号和颜色这两个属性分开来处理,即提供三种型号的画笔,不同颜色通过另外的单独的不同的颜料来搭配之,此时,对于M种不同型号的N种颜色的画笔,仅需要涉及到M + N种对象。
而且增加一种类型的画笔,对于前者来说需要增加N种颜色的类型,而后者只需要增加一种类型即可。对于画笔来说型号和颜色有两种不同变化维度,两个维度有较强的耦合性,将两者解耦,使两个维度独立变化就是本章要介绍的桥接模式。
桥接模式
桥接模式,是对于系统中某个类如果存在两个独立变化的维度,通过该模式可以将这两个维度分离出来,使两者可以独立扩展,让系统更加符合“单一职责原则”。它将两个独立变化的维度设计为两个独立的继承等级结构,并且在抽象层建立一个抽象关联,该关联关系类似一条连接两个独立继承结构的桥。
意图
将抽象部分与它的实现部分分离,使它们都可以独立地变化
参与者
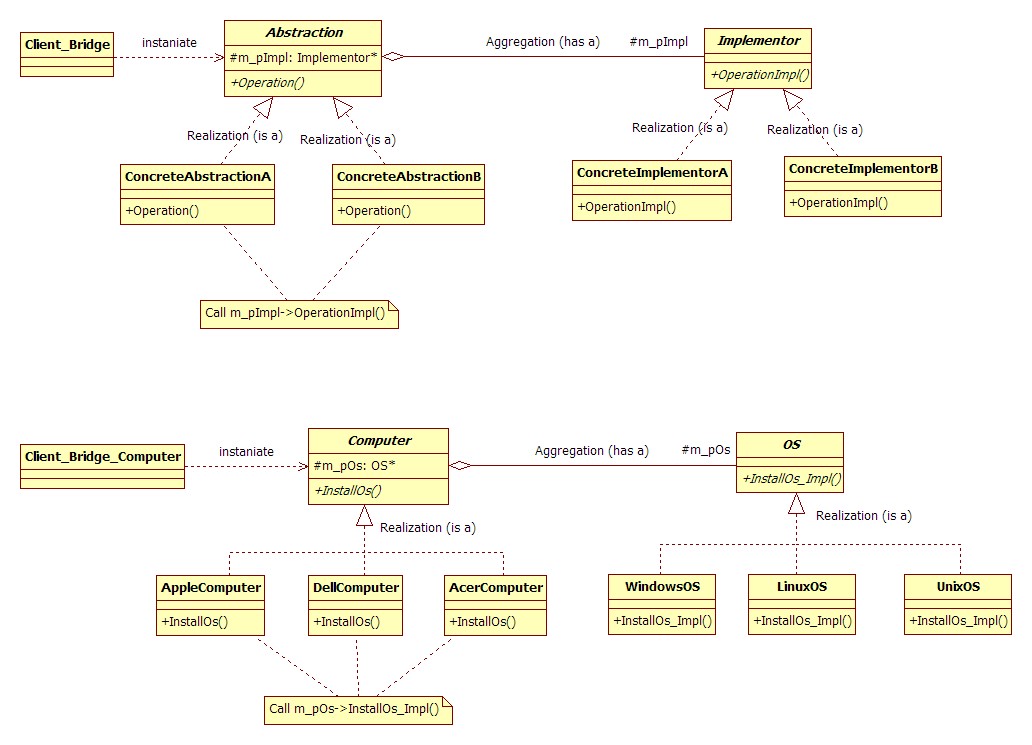
Abstraction
定义抽象类的接口;维护一个指向Implementor的指针ConcreteAbstraction
扩充或重写由Abstraction定义的接口Implementor
定义实现类的接口;该接口不一定要与Abstraction的接口完全一致;事实上这两个接口可以完全不同。一般来说,Implementor的接口仅提供基本的操作,而Abstraction则定义了基于这些基本操作的较高层次的操作ConcreteImplementor
实现Implementor接口并定义它的具体实现
模式结构
代码实现
首先定义一个实现类接口
Implementor,及接口OperatorImp():1
2
3
4
5
6// 实现类抽象接口
class Implementor
{
public:
virtual void OperatorImp() = 0;
};定义两个具体的实现类
ConcreteImplementorA、ConcreteImplementorB,并实现其接口OperatorImp():1
2
3
4
5
6
7
8
9
10
11
12
13
14
15
16
17
18
19// 实现类的具体实现A
class ConcreteImplementorA : public Implementor
{
public:
void OperatorImp()
{
cout << "I am Concrete OperatorImpA" << endl;
}
};
// 实现类的具体实现B
class ConcreteImplementorB : public Implementor
{
public:
void OperatorImp()
{
cout << "I am Concrete OperatorImpB" << endl;
}
};再定义一个抽象类的接口
Abstraction,及接口Operator():1
2
3
4
5
6
7
8
9
10/ 抽象类的接口
class Abstraction
{
protected: // Must Be Protected 继承类要用到
Implementor *m_pImplementor; // 关联抽象的实现类(Aggregation)
public:
Abstraction(Implementor *pI): m_pImplementor(pI) {};
public:
virtual void Operator() = 0;
};定义两个具体的抽象类
ConcreteAbstractionA、ConcreteAbstractionB,分别实现其接口Operator():1
2
3
4
5
6
7
8
9
10
11
12
13
14
15
16
17
18
19
20
21
22
23
24
25
26// 抽象类的具体实现A
class ConcreteAbstractionA : public Abstraction
{
public:
ConcreteAbstractionA(Implementor *pI): Abstraction(pI) {};
public:
void Operator()
{
cout << "Concrete AbstractionA Operation:" << endl;
m_pImplementor->OperatorImp();
}
};
// 抽象类的具体实现B
class ConcreteAbstractionB : public Abstraction
{
public:
ConcreteAbstractionB(Implementor *pI): Abstraction(pI) {};
public:
void Operator()
{
cout << "Concrete AbstractionB Operation:" << endl;
m_pImplementor->OperatorImp();
}
};测试桥接模式:
1
2
3
4
5
6
7
8
9
10
11
12
13
14
15
16
17
18
19
20
21
22
23
24
25
26
27void BridgeTest_Abstraction_Implementor()
{
// ①、② 不同一具体实现ConcreteImplementorA、B,同一的具体抽象ConcreteAbstractionA
Implementor *pI_A = new ConcreteImplementorA();
Abstraction *pA_AA = new ConcreteAbstractionA(pI_A);
pA_AA->Operator(); // CAA ---> CIA
Implementor *pI_B = new ConcreteImplementorB();
Abstraction *pA_AB = new ConcreteAbstractionA(pI_B);
pA_AB->Operator(); // CAA --->CIB
// ②、③ 同一具体实现ConcreteImplementorB,不同的具体抽象ConcreteAbstractionA、B
Abstraction *pA_BB = new ConcreteAbstractionB(pI_B);
pA_BB->Operator(); // CAB ---> CIB
Abstraction *pA_BA = new ConcreteAbstractionB(pI_A);
pA_BA->Operator(); // CAB --> CIA
delete pI_A; pI_A = NULL;
delete pI_B; pI_B = NULL;
delete pA_AA; pA_AA = NULL;
delete pA_AB; pA_AB = NULL;
delete pA_BB; pA_BB = NULL;
delete pA_BA; pA_BA = NULL;
}
运行结果:
Concrete AbstractionA Operation:
I am Concrete OperatorImpA
Concrete AbstractionA Operation:
I am Concrete OperatorImpB
Concrete AbstractionB Operation:
I am Concrete OperatorImpB
Concrete AbstractionB Operation:
I am Concrete OperatorImpA
使用场景
- 一个系统需要在抽象化和具体化之间增加更多的灵活性,避免在两个层次之间建立静态的继承关系,通过桥接模式可以使它们在抽象层建立一个关联关系
- 不希望在抽象和它的实现部分之间有一个固定的绑定关系,也就是继承关系,如果我们打破了这种固定的绑定关系,以后,就可以方便的在抽象部分切换不同的实现部分可以考虑使用适配器模式
- 对客户完全隐藏抽象的实现部分
- 一个对象有多个变化因素的时候,通过抽象这些变化因素,将依赖具体实现,修改为依赖抽象
- 某个变化因素在多个对象中共享时,可以抽象出这个变化因素,然后实现这些不同的变化因素
优缺点
- 优点
- 分离抽象接口及其实现部分。桥接模式使用“对象间的关联关系”解耦了抽象和实现之间固有的绑定关系,使得抽象和实现可以沿着各自的维度来变化。所谓抽象和实现沿着各自维度的变化,也就是说抽象和实现不再在同一个继承层次结构中,而是“子类化”它们,使它们各自都具有自己的子类,以便任何组合子类,从而获得多维度组合对象
- 桥接模式可以取代多层继承方案,多层继承方案违背了“单一职责原则”,复用性较差,且类的个数非常多,桥接模式是比多层继承方案更好的解决方法,它极大减少了子类的个数
- 桥接模式提高了系统的可扩展性,在两个变化维度中任意扩展一个维度,都不需要修改原有系统,符合“开闭原则”
- 缺点
- 桥接模式的使用会增加系统的理解与设计难度,由于关联关系建立在抽象层,要求开发者一开始就针对抽象层进行设计与编程
- 桥接模式要求正确识别出系统中两个独立变化的维度,因此其使用范围具有一定的局限性,正确识别两个独立维度也需要一定的经验积累
桥接模式具体实例
实例1 — 电脑装系统
不同的型号(Dell,Acer)的电脑装不同的操作系统(Windows,Linux)
代码实现
操作系统实现类及其抽象接口
InstallOs_Impl():1
2
3
4
5
6// OS抽象类
class OS
{
public:
virtual void InstallOs_Impl() = 0;
};具体的操作系统类:
1
2
3
4
5
6
7
8
9
10
11
12
13
14
15
16
17
18
19
// Linux OS:
class LinuxOS : public OS
{
public:
void InstallOs_Impl()
{
cout << "Install Linux OS Implementor" << endl;
}
};
// Windows OS:
class WindowsOS : public OS
{
public:
void InstallOs_Impl()
{
cout << "Install Windows OS Implementor" << endl;
}
};电脑抽象类及其抽象接口
InstallOs()方法:1
2
3
4
5
6
7
8
9
10//抽象Computer类
class Computer
{
protected:
OS *m_pOs; // 关联抽象实现类OS
public:
Computer(OS *pOS): m_pOs(pOS) {};
public:
virtual void InstallOs() = 0;
};具体的电脑型号类:
1
2
3
4
5
6
7
8
9
10
11
12
13
14
15
16
17
18
19
20
21
22
23
24class DellComputer : public Computer
{
public:
DellComputer(OS *pOS) : Computer(pOS) {};
public:
void InstallOs()
{
cout << "Dell Computer: " << endl;
m_pOs->InstallOs_Impl();
}
};
class AcerComputer : public Computer
{
public:
AcerComputer(OS *pOS): Computer(pOS) {};
public:
void InstallOs()
{
cout << "Acer Computer: " << endl;
m_pOs->InstallOs_Impl();
}
};测试Computer桥接模式:
1
2
3
4
5
6
7
8
9
10
11
12
13
14
15
16
17
18
19
20
21
22
23
24
25
26
27void BridgeTest_Computer_OS()
{
// 安装Linux OS 的 Dell电脑
OS *pOS_Linux = new LinuxOS();
Computer *pC_Dell_Linux = new DellComputer(pOS_Linux);
pC_Dell_Linux->InstallOs();
// 安装 Windows OS 的 Dell电脑
OS *pOS_Windows = new WindowsOS();
Computer *pC_Dell_Windows = new DellComputer(pOS_Windows);
pC_Dell_Windows->InstallOs();
// 安装 Linux OS 的 Acer电脑
Computer *pC_Acer_Linux = new AcerComputer(pOS_Linux);
pC_Acer_Linux->InstallOs();
//安装 Windows OS 的 Acer电脑
Computer *pC_Acer_Windows = new AcerComputer(pOS_Windows);
pC_Acer_Windows->InstallOs();
delete pOS_Linux; pOS_Linux = NULL;
delete pOS_Windows; pOS_Windows = NULL;
delete pC_Dell_Linux; pC_Dell_Linux = NULL;
delete pC_Dell_Windows; pC_Dell_Windows = NULL;
delete pC_Acer_Linux; pC_Acer_Linux = NULL;
delete pC_Acer_Windows; pC_Acer_Windows = NULL;
}运行结果:
Dell Computer:
Install Linux OS Implementor
Dell Computer:
Install Windows OS Implementor
Acer Computer:
Install Linux OS Implementor
Acer Computer:
Install Windows OS Implementor
实例2 — 画笔问题
实现前言所描述的三种型号(Huge,Mid,Small)和三种颜色(Red,Green,Black)的画笔
代码实现
颜色抽象类及其接口:
1
2
3
4
5
6// Color
class Color
{
public:
virtual void doPaint() = 0;
};颜色具体实现类::
1
2
3
4
5
6
7
8
9
10
11
12
13
14
15
16
17
18
19
20
21
22
23
24
25
26
27// Red
class Red : public Color
{
public:
void doPaint()
{
cout << "Red Color" << endl;
}
}
// Green
class Green : public Color
{
public:
void doPaint()
{
cout << "Green Color" << endl;
}
}
// Black
class Black : public Color
{
public:
void doPaint()
{
cout << "Black Color" << endl;
}
}画笔抽象类及其接口:
1
2
3
4
5
6
7
8
9
10
11// Pen
class Pen
{
protected:
Color *m_pColor; // 被子类所继承和使用
public:
Pen(Color *color): m_pColor(color){};
public:
virtual void Draw() = 0;
}画笔具体实现类:
1
2
3
4
5
6
7
8
9
10
11
12
13
14
15
16
17
18
19
20
21
22
23
24
25
26
27
28
29
30
31
32
33
34
35
36
37
38// HugePen
class HugePen : public Pen
{
public:
HugePen(Color *color) : Pen(color){};
public:
void Draw()
{
cout << "Huge Pen Draw And Use The Kind Of ";
m_pColor->doPaint();
}
}
//Middle Pen
class MiddlePen : public Pen
{
public:
MiddlePen(Color *color): Pen(color){};
public:
void Draw()
{
cout << "Middle Pen Draw And Use The Kind Of ";
m_pColor->doPaint();
}
}
// Small Pen
class SmallPen : public Pen
{
public:
SmallPen(Color *color): Pen(color){};
public:
void Draw()
{
cout << "Small Pen Draw And Use The Kind Of ";
m_pColor->doPaint();
}
}测试实例:
1
2
3
4
5
6
7
8
9
10
11
12
13
14
15
16
17
18
19
20
21
22
23
24
25
26
27
28
29
30
31void BridgeTest_Pen_Color()
{
// Huge Red Pen
Color *pR = new Red();
Pen *pRed_HugePen = new HugePen(pR);
pRed_HugePen->Draw();
// Huge Green Pen
Color *pG = new Green();
Pen *pGreen_HugePen = new HugePen(pG);
pGreen_HugePen->Draw();
// Middle Green Pen
Pen *pGreen_MidPen = new MiddlePen(pG);
pGreen_MidPen->Draw();
// Small Black Pen
Color *pB = new Black();
Pen *pBlack_SmallPen = new SmallPen(pB);
pBlack_SmallPen->Draw();
delete pR; pR = NULL;
delete pG; pG = NULL;
delete pB; pB = NULL;
delete pRed_HugePen; pRed_HugePen = NULL;
delete pGreen_HugePen; pGreen_HugePen = NULL;
delete pGreen_MidPen; pGreen_MidPen = NULL;
delete pBlack_SmallPen; pBlack_SmallPen = NULL;
}
运行结果:
Huge Pen Draw And Use The Kind Of Red Color
Huge Pen Draw And Use The Kind Of Green Color
Middle Pen Draw And Use The Kind Of Green Color
Small Pen Draw And Use The Kind Of Black Color